博客的第一篇文章,就记录一下这个博客从零开始搭建的过程吧。
Hugo
Hugo号称世界上最快的网站建设框架,既然是最快,那一定是静态网站了。之前有用过WordPress建站,用了一段时间后,还是觉得WordPress的许多功能对于博客来说都是冗余的,所以最后还是选择静态的方式。
Hugo的本地安装十分简便:
brew install hugo
使用Hugo创建站点:
hugo new site <name of site> -f yml
这会在当前路径下创建站点文件夹,-f yml表示使用yml作为配置文件格式,如不添加,Hugo则会默认使用toml格式。
PaperMod
在Hugo之前,我还尝试过使用Hexo来搭建博客,一直也没觉得有何不妥。直到有一次在网上冲浪,看到某个博客十分简洁美观,设计很是吸引我。拉到网站底部发现几个大字:Powered by Hugo & PaperMod,可以说PaperMod是我转用转用Hugo的契机。
PaperMod的安装也十分简便,在Hugo站点的文件夹中,运行:
git clone https://github.com/adityatelange/hugo-PaperMod themes/PaperMod --depth=1
再在Hugo的config.yml中添加:
theme: "PaperMod"
即可完成PaperMod主题配置。
个性化设置
PaperMod还提供了演示站点以及站点的源码,供使用者学习参考。其中config.yml的具体内容如下:
baseURL: "https://examplesite.com/"
title: ExampleSite
paginate: 5
theme: PaperMod

enableRobotsTXT: true
buildDrafts: false
buildFuture: false
buildExpired: false

googleAnalytics: UA-123-45

minify:
  disableXML: true
  minifyOutput: true

params:
  env: production # to enable google analytics, opengraph, twitter-cards and schema.
  title: ExampleSite
  description: "ExampleSite description"
  keywords: [Blog, Portfolio, PaperMod]
  author: Me

# author: ["Me", "You"] # multiple authors

  images: ["<link or path of image for opengraph, twitter-cards>"]
  DateFormat: "January 2, 2006"
  defaultTheme: auto # dark, light
  disableThemeToggle: false

  ShowReadingTime: true
  ShowShareButtons: true
  ShowPostNavLinks: true
  ShowBreadCrumbs: true
  ShowCodeCopyButtons: false
  ShowWordCount: true
  ShowRssButtonInSectionTermList: true
  UseHugoToc: true
  disableSpecial1stPost: false
  disableScrollToTop: false
  comments: false
  hidemeta: false
  hideSummary: false
  showtoc: false
  tocopen: false

  assets:
    # disableHLJS: true # to disable highlight.js
    # disableFingerprinting: true
    favicon: "<link / abs url>"
    favicon16x16: "<link / abs url>"
    favicon32x32: "<link / abs url>"
    apple_touch_icon: "<link / abs url>"
    safari_pinned_tab: "<link / abs url>"

  label:
    text: "Home"
    icon: /apple-touch-icon.png
    iconHeight: 35

# profile-mode

  profileMode:
    enabled: false # needs to be explicitly set
    title: ExampleSite
    subtitle: "This is subtitle"
    imageUrl: "<img location>"
    imageWidth: 120
    imageHeight: 120
    imageTitle: my image
    buttons:
      - name: Posts
        url: posts
      - name: Tags
        url: tags

# home-info mode

  homeInfoParams:
    Title: "Hi there \U0001F44B"
    Content: Welcome to my blog

  socialIcons:
    - name: twitter
      url: "https://twitter.com/"
    - name: stackoverflow
      url: "https://stackoverflow.com"
    - name: github
      url: "https://github.com/"

  analytics:
    google:
      SiteVerificationTag: "XYZabc"
    bing:
      SiteVerificationTag: "XYZabc"
    yandex:
      SiteVerificationTag: "XYZabc"

  cover:
    hidden: true # hide everywhere but not in structured data
    hiddenInList: true # hide on list pages and home
    hiddenInSingle: true # hide on single page

  editPost:
    URL: "https://github.com/<path_to_repo>/content"
    Text: "Suggest Changes" # edit text
    appendFilePath: true # to append file path to Edit link

# for search

# https://fusejs.io/api/options.html

  fuseOpts:
    isCaseSensitive: false
    shouldSort: true
    location: 0
    distance: 1000
    threshold: 0.4
    minMatchCharLength: 0
    keys: ["title", "permalink", "summary", "content"]
menu:
  main:
    - identifier: categories
      name: categories
      url: /categories/
      weight: 10
    - identifier: tags
      name: tags
      url: /tags/
      weight: 20
    - identifier: example
      name: example.org
      url: https://example.org
      weight: 30

# Read: https://github.com/adityatelange/hugo-PaperMod/wiki/FAQs#using-hugos-syntax-highlighter-chroma

pygmentsUseClasses: true
markup:
  highlight:
    noClasses: false
    # anchorLineNos: true
    # codeFences: true
    # guessSyntax: true
    # lineNos: true
    # style: monokai
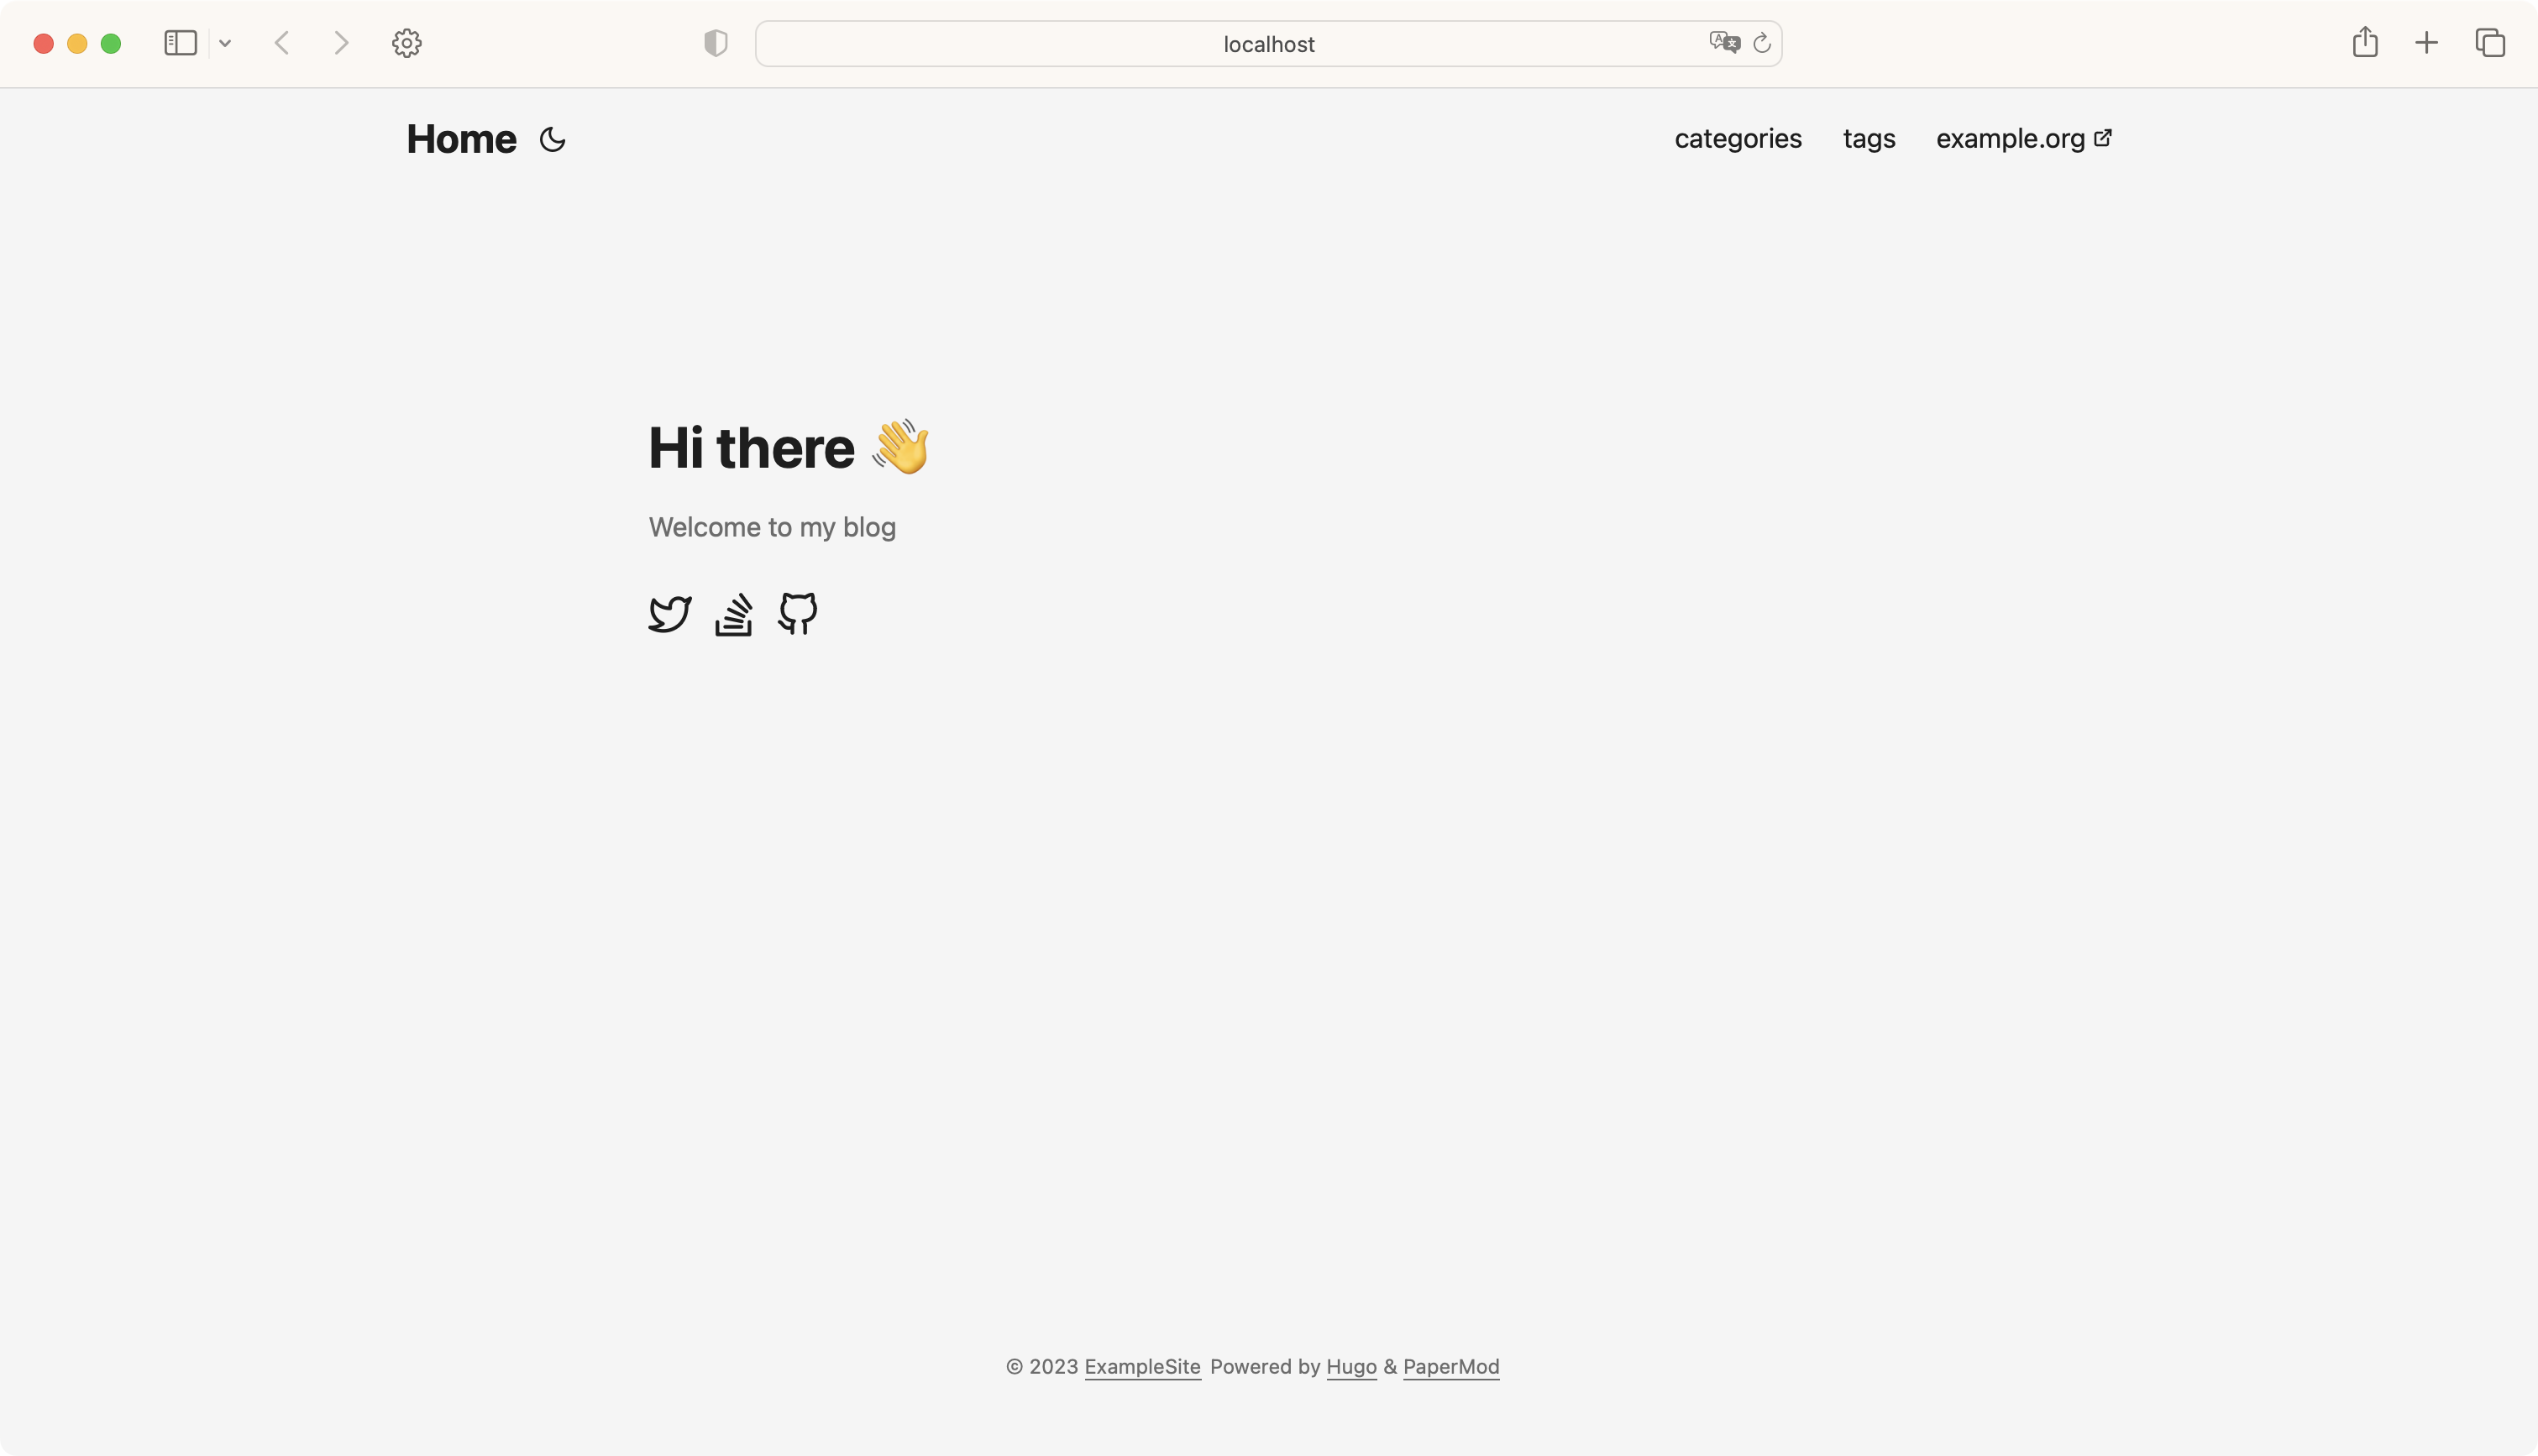
恁多参数,每一个到底啥意思?不管!先抄了再说😆改完配置以后的网站是下面这样的:

下面留空的地方之后是放文章的,总体布局没啥问题,我不喜欢博客里的社交图标链接,所以先把config.yml中的socialIcons注释掉,删掉社交图标。
再看看右上角,我只想要标签,归档和搜索三个功能。标签已经自带了,还差归档和搜索。看一下官方文档,正好有这两个功能的配置细节。
归档
在content文件夹里创建archive.md,并在archive.md里添加以下内容:
---
title: "Archive"
layout: "archives"
url: "/archives/"
summary: archives
---
搜索
添加以下内容到config.yml中:
outputs:
    home:
        - HTML
        - RSS
        - JSON # is necessary
在content文件夹里创建search.md,并在search.md里添加以下内容:
---
title: "Search" # in any language you want
layout: "search" # is necessary
# url: "/archive"
# description: "Description for Search"
summary: "search"
placeholder: "placeholder text in search input box"
---
最后修改config.yml的menu:
menu:
  main:
        - identifier: tags
          name: Tags
          url: /tags/
          weight: 10
        - identifier: archives
          name: Archives
          url: /archives/
          weight: 20
        - identifier: search
          name: Search
          url: /search/
          weight: 30
再改个字体
字体我选用霞鹜文楷,采用CDN配置。在 themes/PaperMod/layouts/partials/extend_head.html 中,加入如下代码:
<link rel="stylesheet" href="https://cdn.jsdelivr.net/npm/lxgw-wenkai-lite-webfont@1.1.0/style.css" />
然后找到/PaperMod/assets/css/core/reset.css 文件,搜索 body { ,修改其中的 font-family :
body {
    font-family: 'PT Serif','LXGW WenKai Lite','Noto Serif SC', serif;
    font-size: 18px;
    line-height: 1.6;
    word-break: break-word;
    background: var(--theme);
}
字体就设置好了。
Vercel
Vercel是一个前端托管平台,我选择用它来托管博客。关于用Vercel托管Hugo的方法,网上众说纷纭:最简单的是直接使用Vercel自带的Hugo模版建站,但我的Hugo已经在本地配置好了,不想重复折腾。
二是先把Hugo发布到GitHub Pages,再从GitHub Pages导入。这样配置简单,但网站必须开源,而且GitHub Pages自带域名,总觉得不太优雅。
最后是把源码上传到GitHub,再用Vercel自带的Hugo框架启动服务。我也尝试过这种方法,但总会有莫名其妙的报错,在试图解决问题的过程中,我发现了最简便的方法。
又要回到Hugo的基本特性了。之前在调试的时候,我都是用hugo server -D在本地开启web服务的。实际上,hugo在创建站点时会生成public目录,直接使用命令:
hugo
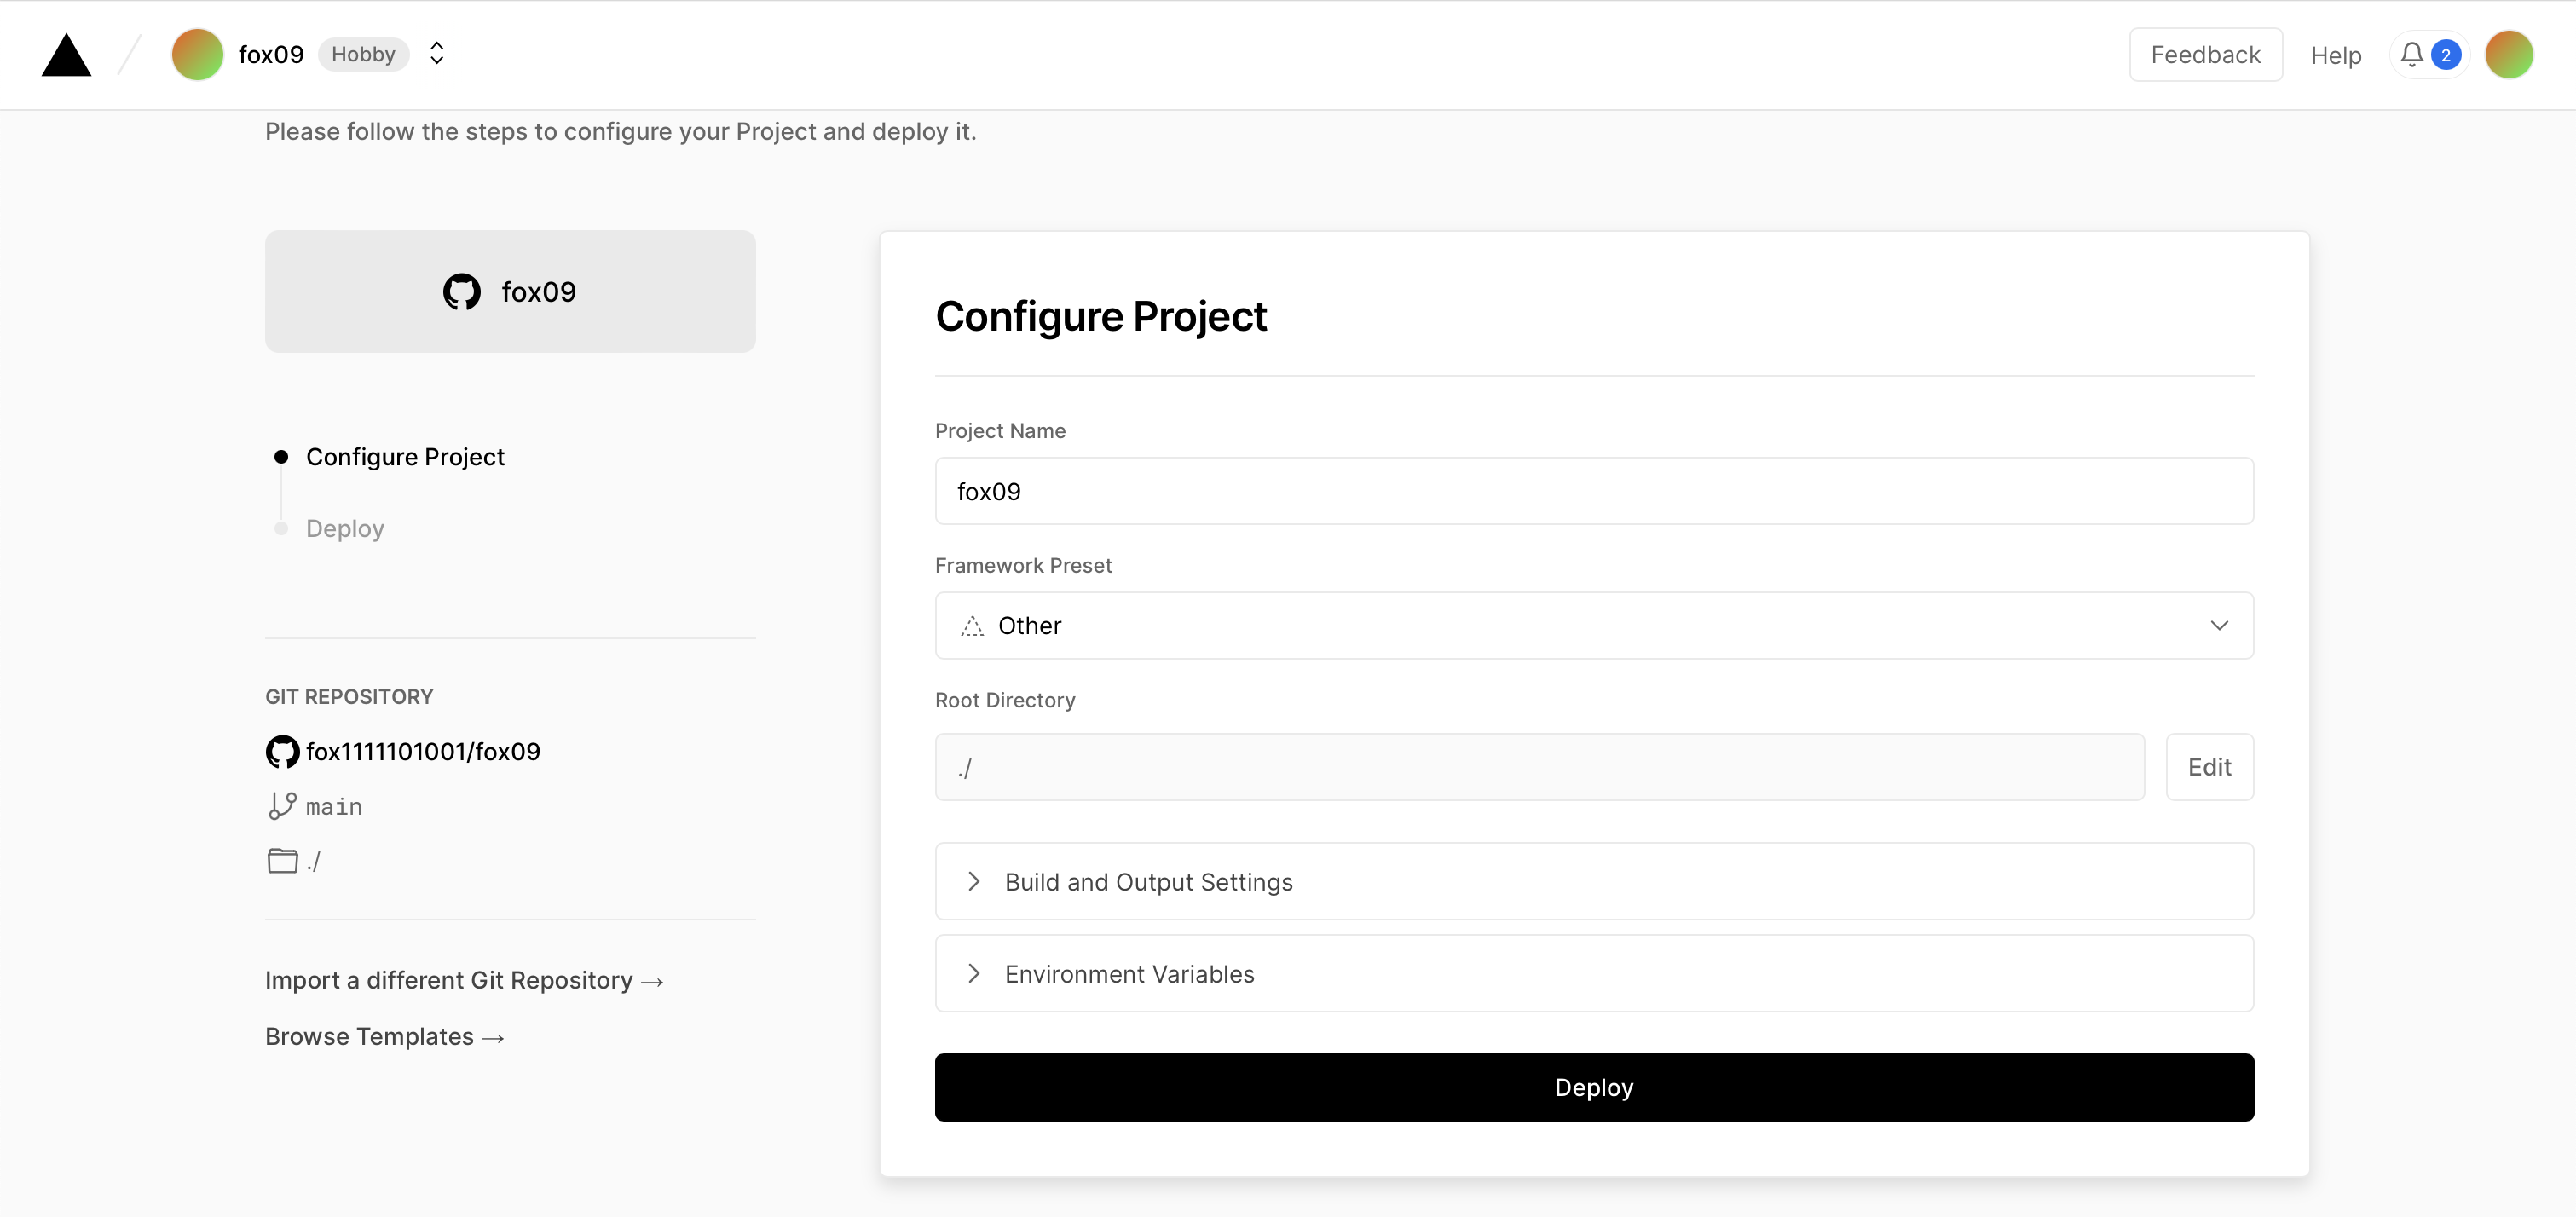
会在public目录中生成网站的静态文件。随后只需要把public目录中的文件上传至GitHub,再用Vercel导入项目。导入时Framework Preset选择Other,而无需选择Hugo,也不用配置任何参数,即可直接生成网站。

域名
Vercel会为每一个项目提供独立的免费域名,但我还是更想要一个符合博客的域名。在Godaddy买了fox09.life,一年只要八块多😄
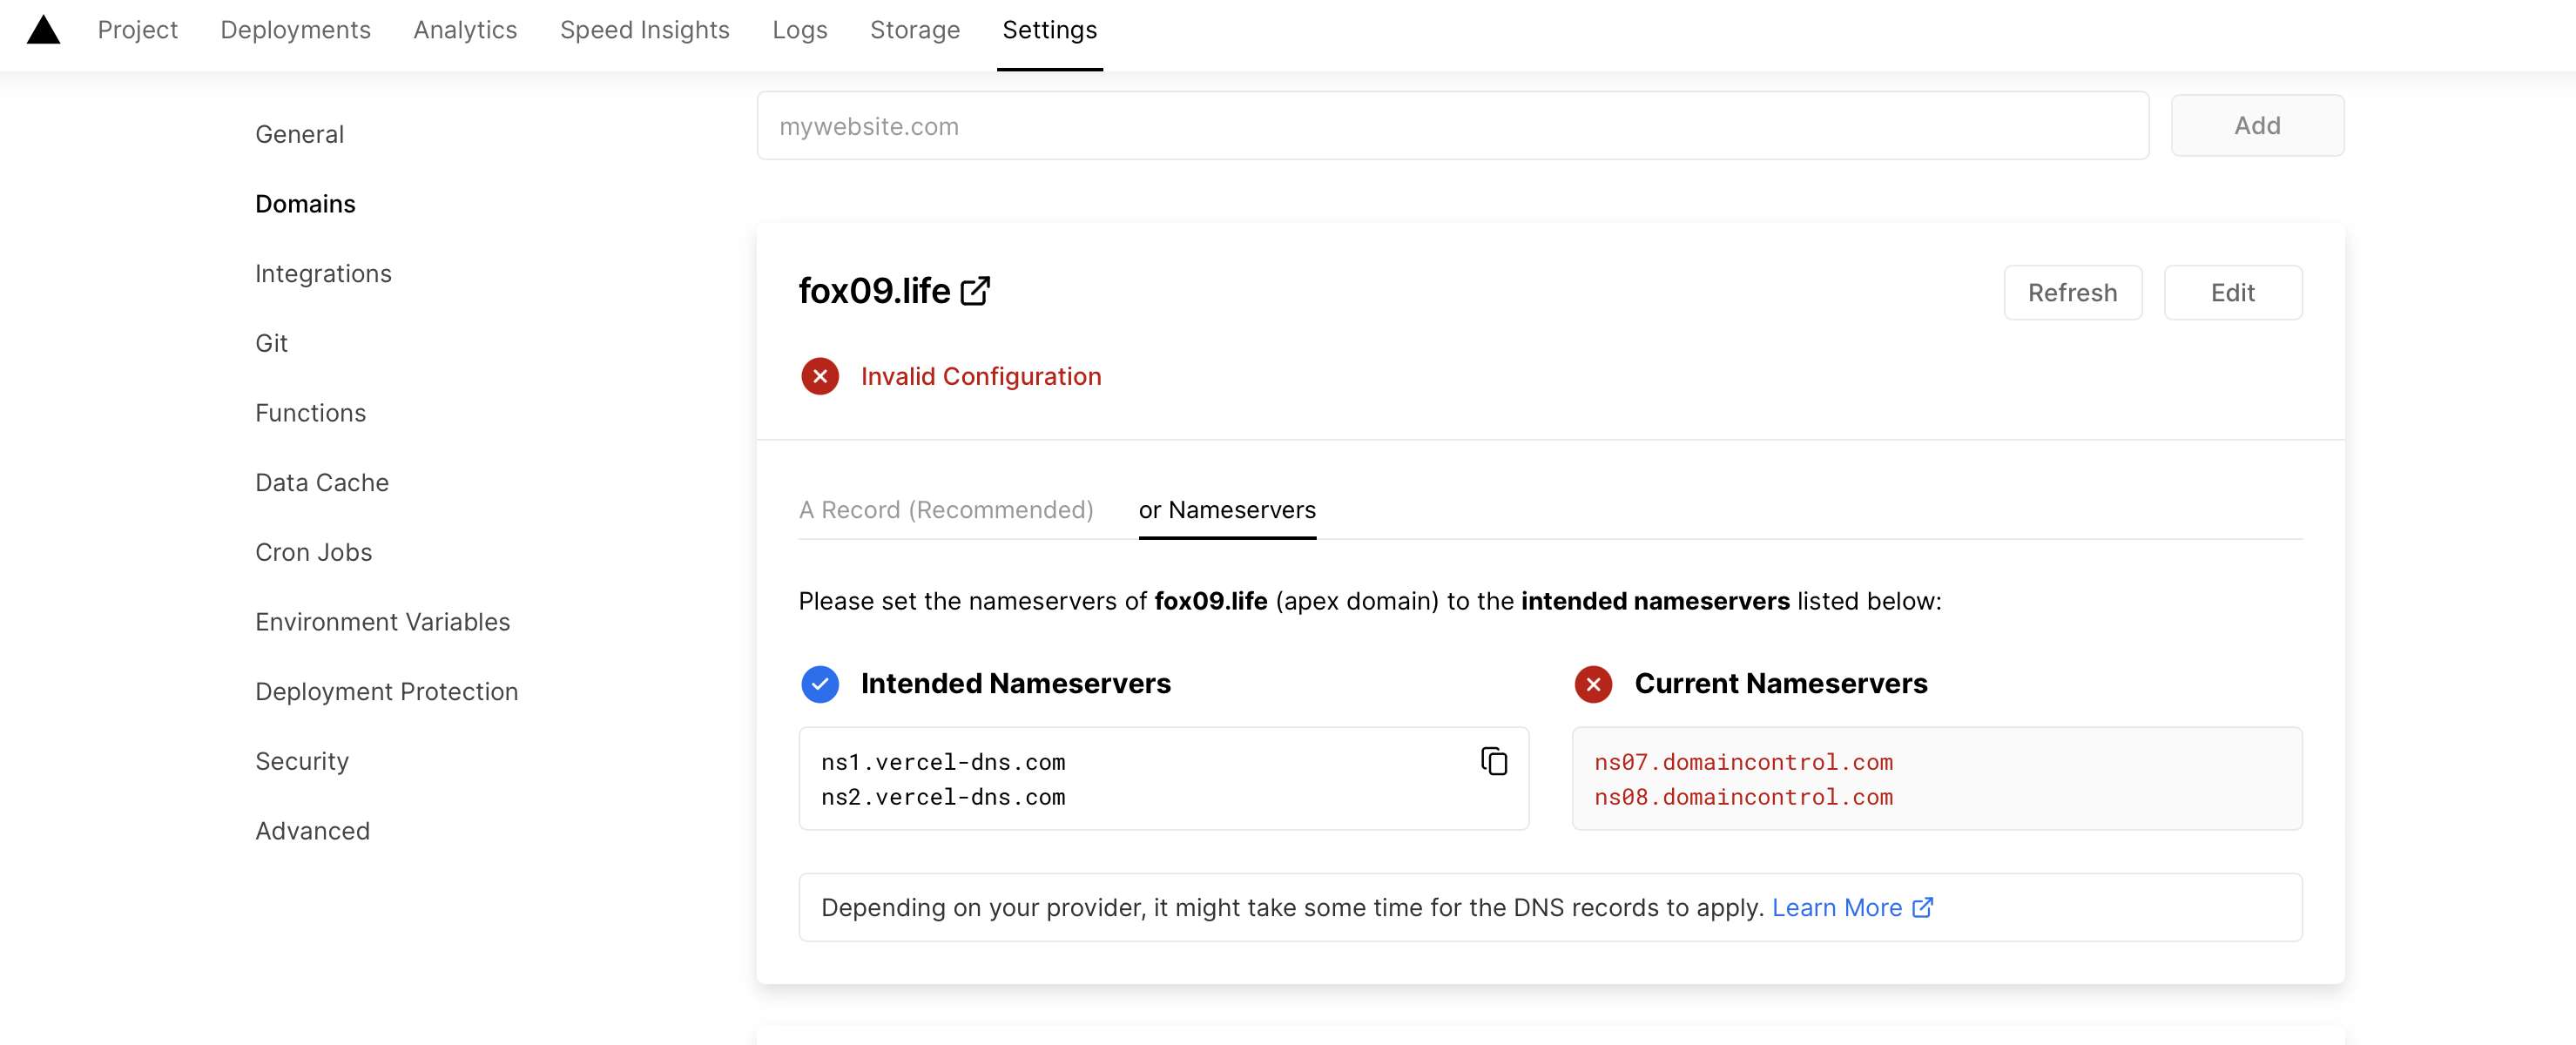
买完以后需要在Vercel和Godaddy上分别做一些设置,先打开Vercel上的项目设置,找到Domains,把购买的域名添加进去。然后切换到Nameservers,复制Vercel提供的两个域名服务器。

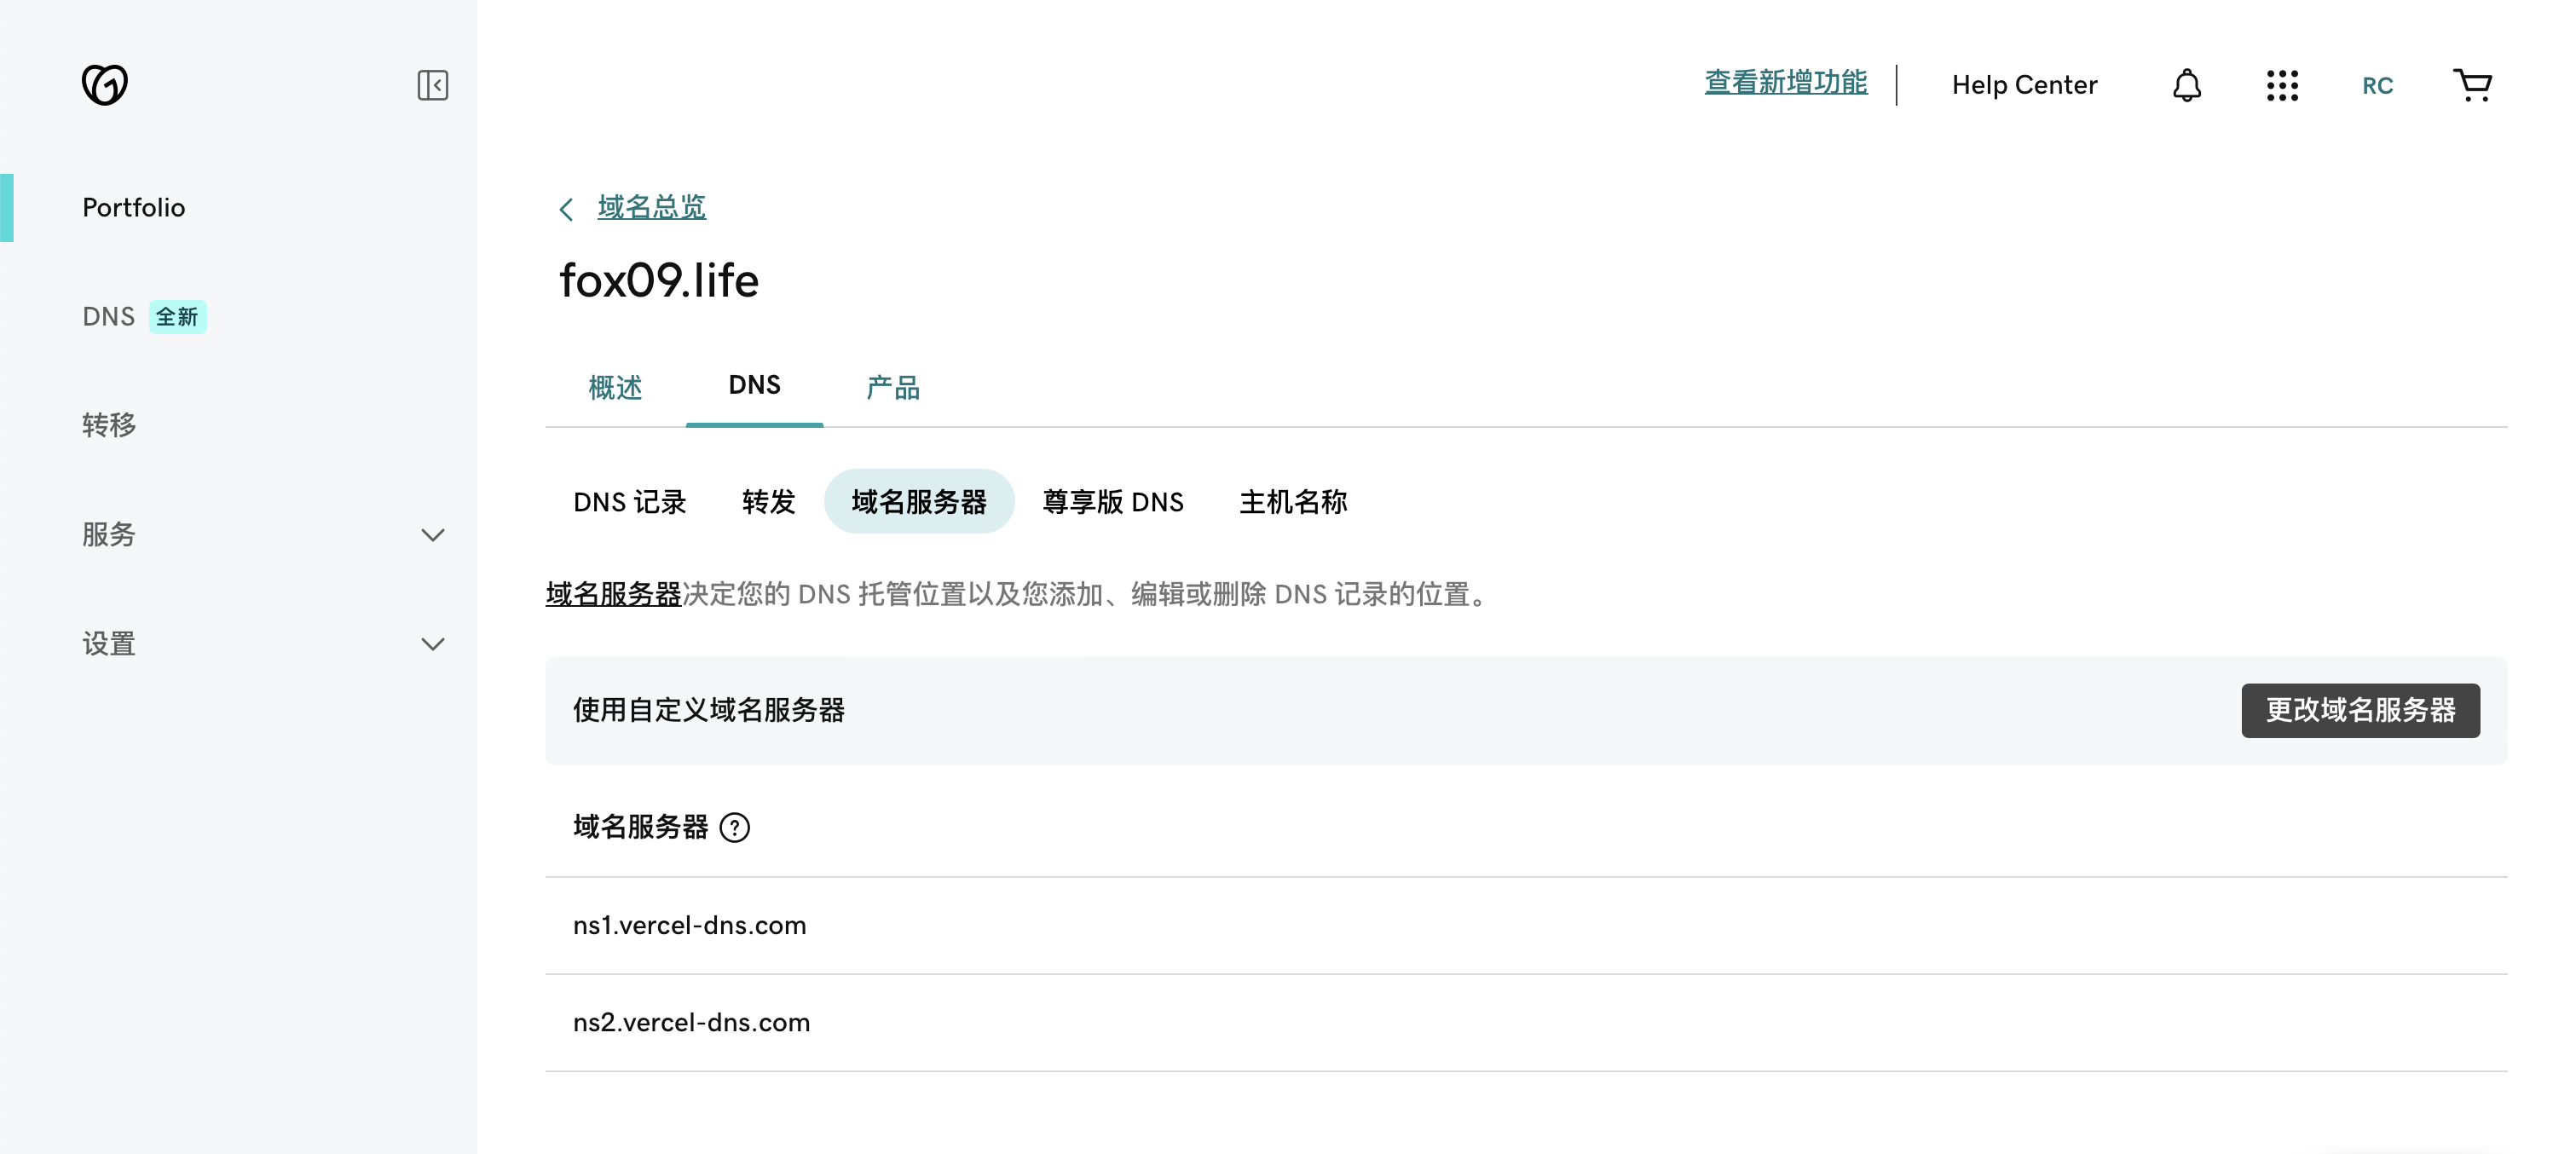
打开Godaddy,填入域名服务器信息

等待大约十几分钟后,域名服务器才会生效。这是因为DNS记录被更改时需要一段时间来传播,全球DNS提供商识别到这些更改后,配置才真正生效。
最后…
总不能每次上传都手动add、commit、push吧?于是弄了一个上传小脚本
#!/bin/sh
cd /Users/fox09/blog/fox09/ && hugo
cd /Users/fox09/blog/fox09/public/
git add *
git commit -m "push"
git push
上传之后,我还针对config.yml进行了基础的修改,由于过于琐碎繁杂,就不一一记录了。
总之,现在看到的就是博客的成品啦😊